





This guide covers everything you need: what to buy, how to shuck safely using the classic hinge method, how to make a five-minute mignonette, and how to serve oysters at home in a way that feels genuinely impressive.
What you actually need before you start
Oyster shucking is the process of prying open a live oyster's shell to expose the meat and its natural liquid, known as the liquor or brine. That's the simple definition. The part that trips up most beginners isn't the technique itself; it's not having the right setup before they pick up a knife.
Here's what you need on the table before you open a single oyster:
- A proper shucking tool (more on this in a moment)
- A bowl of ice water to rinse your knife blade between oysters and remove shell debris
- Crushed ice or rock salt to hold the finished oysters on the half shell
- A clean kitchen towel as a backup grip surface
- 12 fresh oysters, scrubbed under cold running water
Oyster selection matters more than most beginners realize. According to In a Half Shell's shucking guide, an oyster's "shuckability" has more to do with shell shape, hinge angle, shell thickness, and shell integrity than oyster size. A warped or irregular hinge will fight you even with perfect technique. Source your oysters from a reputable fishmonger and ask specifically for shells with uniform shape and an accessible hinge. Fulton Fish Market's shucking guide also recommends scrubbing shells under cold water and keeping them cup-side down on ice until you're ready to shuck, which preserves the liquor inside.
Good prep is half the battle. Sourcing well-shaped oysters and setting up your station before you start will save you more frustration than any amount of technique practice.
Why most beginners get hurt (and how to avoid it)
The number one fear for first-time shuckers is the knife slipping and cutting their hand. That fear is completely reasonable. The classic towel method, which involves wrapping the oyster in a folded kitchen towel and pressing it firmly against the counter, is the standard beginner approach recommended by sources like Andrew Zimmern's shucking guide and Fulton Fish Market. It works. But it has a real limitation: your hand is still close to the blade, and you're dividing your attention between holding the oyster still and controlling the knife.
In a Half Shell points out that beginners should never look away from their hands during shucking, even for a second. That level of vigilance is exhausting when you're opening 12 oysters for a dinner party.
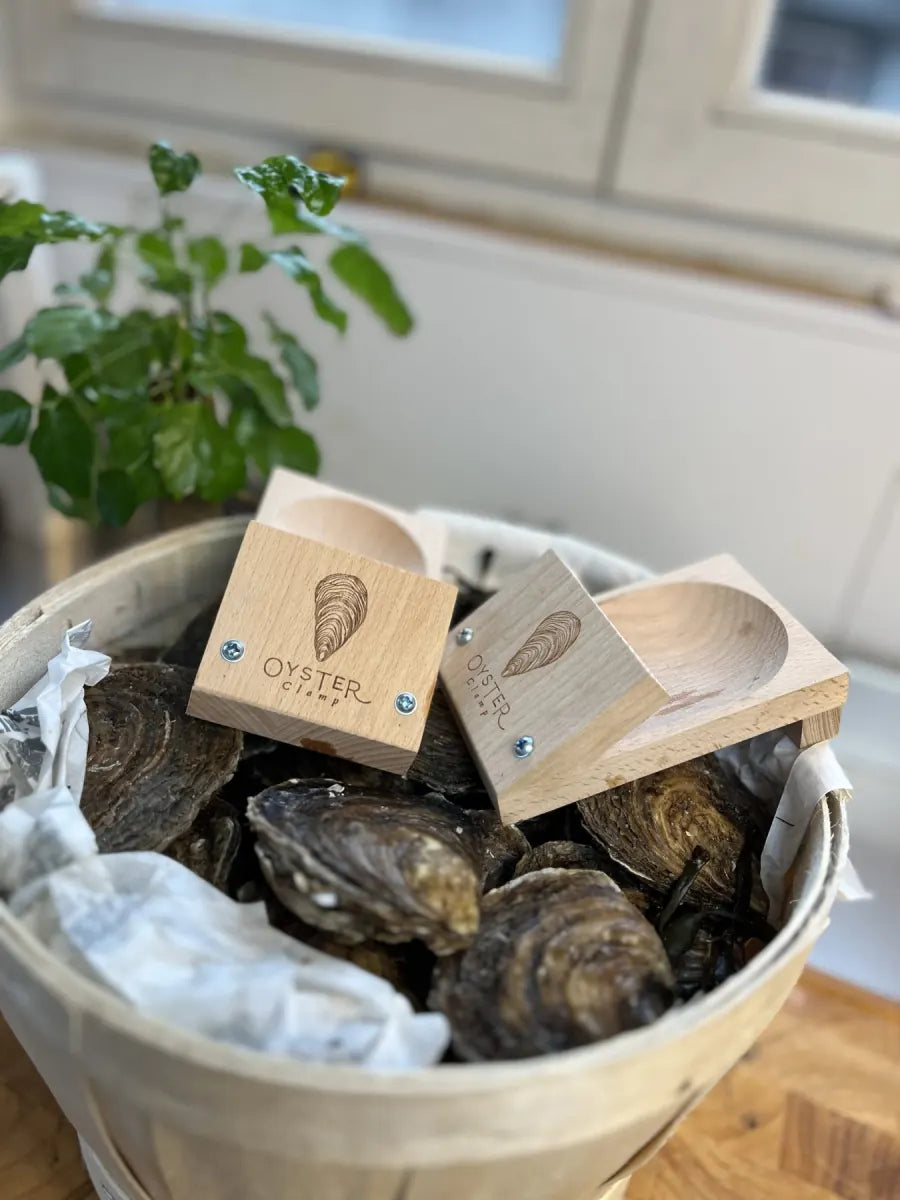
This is exactly the problem the OysterClamp 2.0 was designed to solve. Built by Michelin Star Chef Henk, who spent 20 years at the restaurant Sans Cravate, the tool uses a 25-degree lock design that holds the oyster at the optimal shucking angle without any hand involvement. Your fingers stay completely away from the blade. You're not white-knuckling a towel. You're just focused on the knife.
The clamp is constructed from AA-grade European hardwood with natural moisture resistance, so it won't warp or crack with regular kitchen use. Because the oyster is mechanically secured, you can work at a steady pace without losing grip mid-shuck. For anyone with arthritis or reduced grip strength, this isn't just more convenient; it's what makes shucking possible at all.
The towel method is a starting point, not a destination. The OysterClamp 2.0 removes the hand-proximity risk entirely, which is the specific thing beginners are most afraid of.
Step-by-step: how to shuck oysters at home
There are four recognized shucking methods: the classic hinge shuck, the lockpick shuck, the cryo shuck, and the blanch shuck, as outlined in this YouTube breakdown of shucking techniques. For beginners, the classic hinge method is the right starting point. It requires no specialized knowledge beyond a good shucking tool and delivers consistent results.
Here's how to do it with the OysterClamp 2.0:
1. Load the oyster into the clamp
Place the oyster cup-side down in the clamp with the pointed hinge end facing outward toward you. Lock the clamp. The oyster should be completely stable, with no movement at all.
2. Find the hinge
The hinge is the narrow, pointed end where the two shells meet. This is your entry point. Don't try to force the knife along the side of the shell; that's where most beginners run into trouble.
3. Insert the knife and twist
Place the tip of your oyster knife into the hinge. Apply firm, controlled pressure and twist the knife slightly, like turning a key. You'll feel a pop when the hinge releases. This is the moment. Don't stab or force; it's a twist, not a thrust.
4. Run the knife along the top shell
Slide the knife along the inside of the top shell to sever the adductor muscle attached there. Remove the top shell.
5. Free the oyster from the bottom shell
Run the knife under the oyster along the bottom shell to release it completely. Keep the shell level to preserve the liquor inside.
6. Rinse the knife in ice water
Dunk your knife in the bowl of ice water between each oyster. This removes shell debris without diluting the oyster's flavor. In a Half Shell specifically recommends this step as a pro technique.
7. Check for shell fragments
Look for what's sometimes called the "oyster's molar," a small fragment of shell that can fall from the hinge into the cup. Remove it with the tip of your knife or a quick rinse. It's common and completely normal.
Place the finished oyster on your crushed ice or rock salt bed, cup-side up to keep the liquor in. Repeat.
The classic hinge method with a stable clamping tool is the fastest path from zero experience to a plated oyster. The OysterClamp 2.0 keeps the shell locked and level throughout each step, which means you're only thinking about the knife, not the grip.
How to make a classic mignonette sauce
Mignonette is a traditional French condiment for freshly shucked raw oysters, made from minced shallots, vinegar, and cracked black pepper. According to Andrew Zimmern's recipe guide, it's one of the most classic accompaniments to oysters on the half shell, and it takes about five minutes to make.
Classic mignonette recipe (serves 12 oysters):
- 2 medium shallots, very finely minced
- ¼ cup red wine vinegar
- 1 teaspoon freshly cracked black pepper
- A small pinch of sea salt (optional)
Combine everything in a small bowl and stir. Let it sit for at least 15 minutes before serving so the shallots soften slightly and the flavors meld. It keeps in the fridge for up to a week.
The reason mignonette works so well with oysters is contrast. The sharp acidity of the vinegar cuts through the natural brininess of the oyster, while the shallot adds mild sweetness and the pepper brings heat. But this balance only works when the oyster's liquor is intact. If the brine spills during shucking, you're left with a dry, flat oyster that the mignonette overwhelms rather than complements.
This is why liquor retention matters so much during the shucking process. The OysterClamp 2.0 keeps the oyster level and locked in place throughout, which means the liquor stays in the cup where it belongs. You're not tilting, fumbling, or wrestling with the shell. The oyster stays flat, the brine stays in, and the mignonette does exactly what it's supposed to do.
Variations: Some cooks swap red wine vinegar for champagne vinegar for a lighter finish. Others add a few drops of lemon juice or a small pinch of fresh thyme. The base ratio stays the same: shallot, acid, pepper.
Make the mignonette first, before you shuck a single oyster. It only gets better as it sits.
How to serve and store oysters at home
Freshly shucked oysters should be served immediately, sitting on a bed of crushed ice or rock salt to keep them cold and prevent them from tipping. Serving temperature matters: oysters are best between 35°F and 45°F (roughly 2°C to 7°C). Any warmer and the texture suffers; any colder and the flavors are muted.
If you're serving 12 oysters for a dinner party, shuck in batches of four to six rather than all at once. This keeps everything cold and fresh, and it means you're not rushing through the last few while the first ones warm up on the table.
For storage, live unshucked oysters keep in the refrigerator for up to five days when stored cup-side down, covered with a damp cloth rather than submerged in water. Once shucked, oysters should be eaten the same day. If you're not confident about freshness, check that the shells are tightly closed before shucking. A shell that won't close when tapped is a sign the oyster is no longer alive and should be discarded.
A simple serving spread alongside the mignonette might include lemon wedges, a bottle of hot sauce, and sliced sourdough with salted butter. Keep it minimal. The oyster is the star.
Serve cold, serve fast, and shuck in batches. The right setup does most of the work, and a well-made mignonette turns a home kitchen into a proper oyster bar.
Ready to shuck your first dozen?
Shucking oysters at home for a dinner party isn't something reserved for professional chefs. With the right tool, a solid technique, and a five-minute mignonette, it's genuinely achievable on your first attempt. The key is removing the variables that cause problems: unstable oysters, hand proximity to the blade, and spilled liquor.
The OysterClamp 2.0 handles all three. It was designed specifically for home cooks, by someone who has opened more oysters than most of us will ever see, and who understood that the barrier isn't skill, it's setup.
At €25.95 (currently 50% off from €51.95), it's a straightforward investment for anyone who wants to serve oysters at home more than once. It also comes with a free Michelin Star chef oyster recipe ebook (valued at €17.95), which gives you plenty of ideas for what to do once the shucking is no longer the intimidating part.
Get the OysterClamp 2.0 and start shucking with confidence
Frequently asked questions
Can I shuck oysters at home without any experience?
Yes. The classic hinge method is straightforward enough for a complete beginner, especially with a stabilizing tool. The main skill is finding the hinge and applying controlled twisting pressure, not brute force. Most first-timers open their first oyster successfully within a few attempts. The OysterClamp 2.0 holds the shell in place so you can focus entirely on the knife rather than managing the grip.
What is mignonette and how is it different from cocktail sauce?
Mignonette is a traditional French condiment made from minced shallots, red wine vinegar, and cracked black pepper. It's lighter and more acidic than cocktail sauce, which is tomato-based with horseradish. Mignonette is considered the classic pairing for raw oysters on the half shell because it enhances the oyster's natural brine without masking it.
Do I need a special knife to shuck oysters, or can I use a regular kitchen knife?
A regular kitchen knife is not safe or effective for shucking. Oyster knives have a short, thick blade designed to withstand the lateral twisting force required to pop the hinge. A standard knife can snap or slip under that pressure. If you're just starting out, look for a dedicated shucking knife designed for home cooks rather than a multipurpose blade.
How do I know if an oyster is fresh and safe to eat?
Live oysters should have tightly closed shells, or shells that close when tapped. They should smell like the ocean, clean and briny, not fishy or sour. Discard any oyster with a cracked shell, a shell that won't close, or an off smell. Once shucked, eat them the same day.
How long does it take to shuck oysters once you have the right tool?
With practice, most home cooks can shuck an oyster in under 60 seconds. Speed isn't the goal for a dinner party; consistency and keeping the liquor intact matter more. With the OysterClamp 2.0 holding the shell steady, beginners can focus entirely on knife placement rather than grip, which shortens the learning curve considerably.
Can I make mignonette ahead of time?
Yes, and it's actually better if you do. Making the mignonette 30 to 60 minutes before serving allows the shallots to soften in the vinegar and the flavors to meld properly. It keeps in the refrigerator for up to a week in a sealed container, so you can make a larger batch if you're planning multiple oyster nights.